The "Worthmaster" Guitar
No expenses spared. Boutique design meets boutique parts.
Project Page
This article is part of a project. You can see its current status, as well as find other information and articles about this project at its project page.
tl;dr
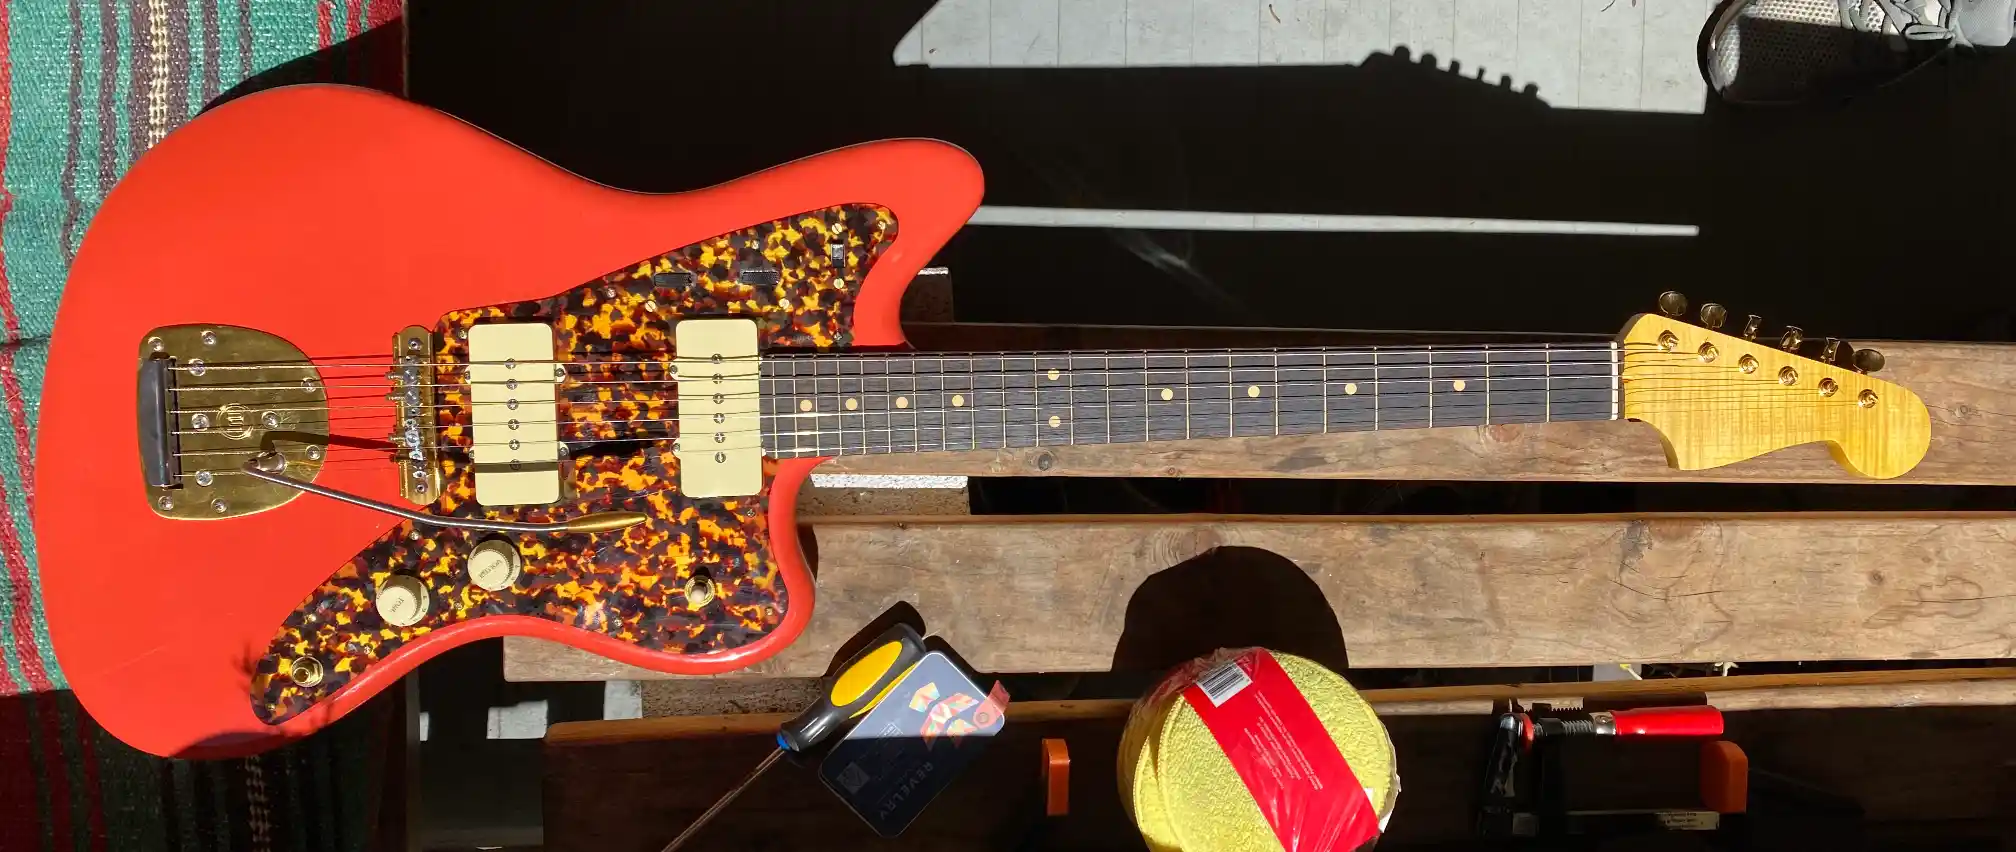
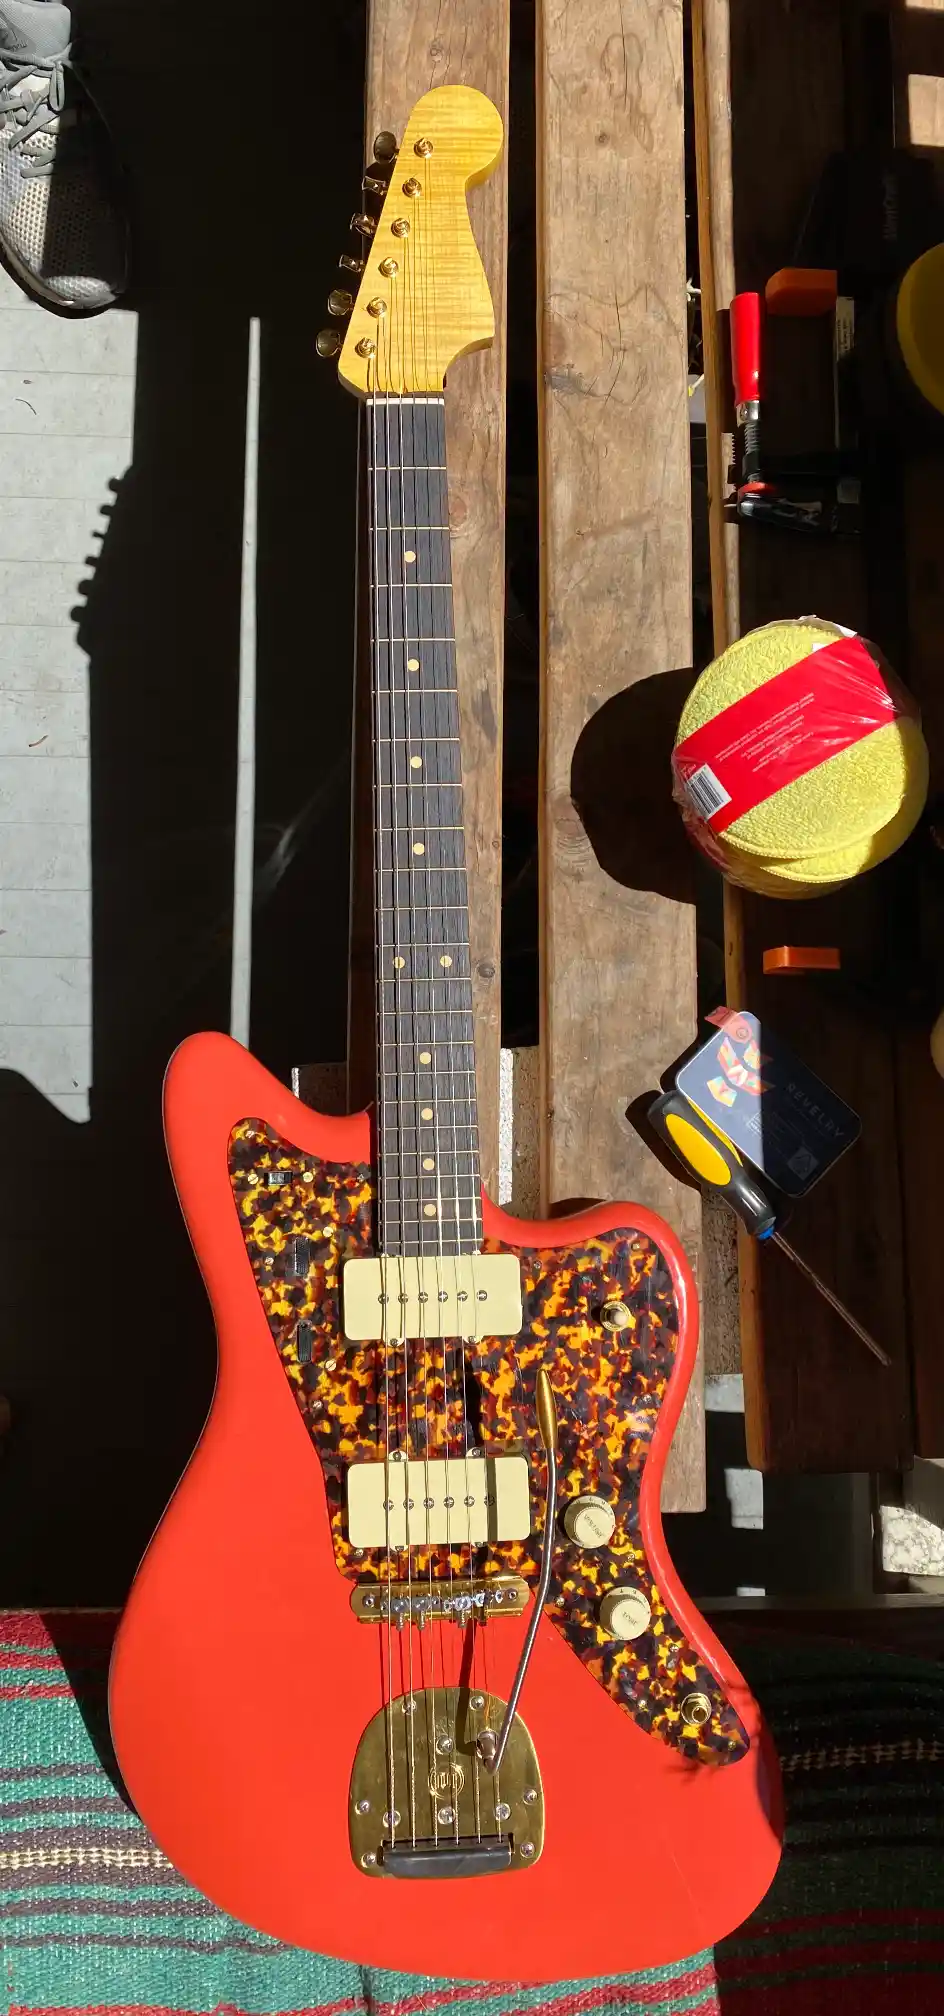
I made a nice guitar. It has a 'Fiesta Red' Jazzmaster-style body by Warmoth, 5A flame maple Musikraft neck, Lollar pickups, and a limited edition gold mastery bridge. It cost $2654.47.
°l||l°l||l°l||l°l||l°l||l°l||l°l||l°l||l°l||l°l||l° My first guitar was given to me when I turned 13 by my, then at the time, sister's boyfriend. He said, "Your 13 now, which means you're a teenager, and teenagers get in trouble if they don't have a hobby." It was candy apple red, spray-painted, and had been built out of an amalgamation of different parts that he undoubtedly had lying around. I don't think now any guitar enthusiast would look at it and think there was anything remarkable about it. Despite now being in my early 30s, with years of more experience, I struggle to form any sort of opinion about how this guitar stacked up - a skill that all guitarist seem to somehow cultivate over the years. Yet, in the case of this guitar, I can't. It was my first, before I knew anything, and I think maybe for a year or so I barely played it in front of anyone, let alone had the self-awareness to be a gear snob. What's special though about the guitar is the way I was introduced to the instrument. Like, here, I made this for you, figure the rest out. I think starting my relationship with the instrument in that way delayed the inevitable devolution into a gear acquisition enthusiast, for I somehow just perpetuated this custom of not buying guitars; all the while absorbing the requisite information. Sure, in the twenty years since that first guitar, I bought one here or there, but those purchases were always rooted in some very practical conceptual framework, like, I bought this or that guitar, because it was better than what I have now and it's a better than fair price for the value... but I never really made a purchase as an "enthusiast". Nonetheless, in all the years between my first guitar and my Worthmaster™, i.e. the subject of this article in case my meanderings have deprived you of a point thus far, my latent power as a gear snob grew. And in any case, generally speaking, I grew up of somewhat modest means for someone born in the USA, and I probably have a more-than-average thriftyness skill-level developed as a consequence; magical homemade first guitar or otherwise. And yet, in spite of this, while in this dormant state, I still managed to secretly cultivate a taste for good gear. Absorbing every data point that came my way, quietly cross-referencing them to prior ones, every time I saw another musician with a beautiful instrument I would mentally perform this dress rehearsal, and imagine their life in that instant as if it were mine - but with that guitar. Until one day, something just clicked, and I realized that I could just buy myself a nice guitar and stop thinking about it. That's what the "Self Worthmaster" was about, a name which despite the sound isn't really tongue-in-cheek. However, buying something outright felt too crude and not at all in my style, so I decided to counteract this guilty pleasure by also making it a learning experience, designing out and constructing the exact guitar that I wanted. The process was carried in a few steps over the course of about a year: This was the phase that took the longest. I'd estimate I spent about 6 months doing the research and design. My design goals were simply to make the best guitar. In this case, the best guitar costs a little less than other guitars in the same class, without making compromises in the quality of build, components, finish, and especially sound quality. There were two main guitars that inspired the design of this one. First, in August '20, there was a beautiful '65 Fender Jazzmaster that I saws on Reverb with Lollar pickups. This guitar was listed for about $3,100 USD, without a case, and a few parts of it weren't original, like the pickups that I mentioned above. That makes it really hard to justify spending that kind of money, especially with the mindset that I described in the introduction. So I submitted an embarrassingly low bid that was promptly rejected by the seller. What inspired me about this guitar was just how beautiful and cool it was. That is an extremely important feature of the best guitar. It's a shame that the listing is now down, because the thumbnails I have here don't do it justice. The other guitar that served as inspiration was a Collins 360 LT M Special that I played at Austin Guitar House in February of '21. This guitar was simply a dream to play. Something happened while I was noodling around that I can't describe, but I think a lot of players can relate to. You just connect with the instrument in a way that you will always remember. Unfortunately it's about $5,100 new (with a case though 😅). In terms of build quality, finish, components, etc... this guitar is definitely in the top of its class, but the price is also at the top, so it doesn't meet the best standard that was defined earlier in the beginning of the design section. That being said, I ended up cross referencing a lot of the ideas I came up with for the design of the Worthmaster with this guitar, to see how a guitar I knew I liked did something in comparison to what I was trying. For the most part, the Worthmaster specs ended up, independently arriving at almost identical specs to this guitar. Doing research on guitar stuff is really hard, because there is so little objective information, and as an industry it is particularly susceptible to magical thinking (e.g. paper in oil capacitors, etc...). I'll share some links below that I found helpful in guiding the design. At the same time, an electric guitar is really not a very complicated machine, and there are very few things that are going to make it materially better. We'll talk more in-depth further down about what does and does not work, but I just think it's important to say that in general a guitar is not like a GPU or some complicated piece of machinery where there's a ton of room for improvement. Much of the research involved separating what was materially important and what was just fluff. Let's talk about tone-wood real quickly. To put it succinctly, sound quality should not be a criteria when choosing what type of wood to build an electric guitar from. Let's be even more clear. Yes, different woods sound... different, but that's really all. One wood is not going to sound better or worse, and the effect is barely noticeable. So when I say different woods sound different, I just mean different, not better nor worse. The truth is that people have to look for proof that wood choice matters, because they want to believe it. These minute differences end up confirming what they want to prove, but they're not done in a controlled, blind way. Therefore, "Sound quality" is simply not an criteria that should factor into anyone's calculus in choosing wood for an electric guitar design, full stop. Therefore, "Sound quality" is simply not an criteria that should factor into anyone's calculus in choosing wood for an electric guitar design, full stop. That being said, wood really does matter a lot, just in other, more practical and measurable ways. To me, density and the "hardness" of the wood (i.e. I mean how likely it is to resist dents and deformation) were what I wanted to strike a balance between. Obviously if I was planning on building the "one guitar" I'll ever need, I don't want it be super soft and susceptible to damage. However, the more resistant the wood is, the more dense (and heavy) it is. Picking the strongest wood you can find is probably a bad idea for this reason, as you'll have a tough body, that will destroy your body. You also get to a point where it's tough enough, and anything past that is adding unnecessary weight. There is one exception though. Torrefied maple is sort of the one exception to hardness vs density dilemma, and potentially a silver bullet. This is a process essentially where they put the wood in a huge oven and heat it until it loses a lot of water content, shrinking in the process. The result is a wood that is much lighter, and potentially as strong. Ultimately I decided against this, since there's a 3rd criteria, cost, as well as the risk of just the unknown. In retrospect, I think this last concern was overblown, and it would be worth considering torrefied maple in the future. The weight savings is worth the money as well. Torrefied maple is sort of the one exception to hardness vs density dilemma, and potentially a silver bullet.[...] The result is a wood that is much lighter, and potentially as strong. For the body I ended up choosing African Mahogany, which has Janka Hardness of 4,760 N and an Average Dried Weight of 640 kg/m^3. This is somewhere in between Alder and Maple in terms of durability vs. weight. For reference: For the neck, wood is also important, since the neck is rarely painted. So you mostly just want whatever fits with the aesthetic you're going after. For this build, I decided to do a 5A, highly flamed maple neck, with a dark Indian Rosewood fingerboard. Scale length is an important factor in a guitar's design, but for different reasons than one might expect. I chose a shorter scale length (24 3/4") because less tension would be required for the strings to reach the same pitches. This would improve the playability of the instrument, which is a reliable way to lead to the instrument sounding better. There's a lot of talk about "tone" and scale length, but it's unclear to me how much of a role it actual plays on a guitar. In many cases, I think the advice that's given around how scale length affects tone is confusing or contradictory. E.g. long scales favor "brightness", yet longer scales are also used to for "increased bass output". I think a lot of the confusion comes around words like "brightness" and "warm" which have may been used in an intellectually honest way once, only to be repeated again and again, to the point where they've lost all meaning. In any case, to understand this better - and why I chose what I did - we don't need to rely on that. Instead we can think about a two string: one long, one short, but both tuned to produce the same pitch. As the strings vibrate, there are integer multiples that vibrate within the string. It's these overtones that produce the "tonal" quality of a note. The difference between a concert A on a piano and a violin is the overtones. According to the University of Rochester's Physic 103 course, "A string that has strong higher overtones at longer times after plucking is said to have a “bright” sound. A string with higher overtones that quickly decay after plucking is said to have a “soft” sound." A string that has strong higher overtones at longer times after plucking is said to have a 'bright' sound. A string with higher overtones that quickly decay after plucking is said to have a 'soft' sound. ⎯ Segev BenZvi, Department of Physics and Astronomy, University of Rochester Now if we revisit our two strings vibrating, it should be clear that the longer string will have to be strung tighter to achieve the same pitch as the shorter one, so it will definitely be more tense. However, it will also contain more energy, and thus the idea is, maybe, that a longer string's overtones will decay slower. This is my best attempt at translating the actual physics into what is often said about scale length and guitar tone. However, in reality, how the wave mechanics of a vibrating string actually translate into sound in any one particular real world scenario is a complicated subject. Additionally, we haven't addressed the psychological aspect of how the human ear perceives those overtones (don't worry, we won't). At the end of the day though, while there is definitely a theoretical basis for how this works, it's much more appropriate to apply it across different categories of instruments, and difficult to draw useful conclusions between a scale lengths that differ by 3/4" of an inch. Furthermore, it does nothing to tell us what is actually good or bad. For example, the difference in timbre between Fender Stratocasters and Gibson Les Pauls is often cited as proof for the affect of scale length on a guitar's timbre. Fender Stratocasters sound brighter, especially in the higher register, and they have a longer scale length (25.5"), whereas Gibson Les Pauls sound softer and have a shorter scale length. It might seem like because "bright" in this context means preserving overtones, then the Fender is better (because we have more overtones I suppose...), however in reality, both guitars sound great and one could even argue that at times Fender high notes are too trebly. However, and this is very important, there are other, more believable explanations for why there's this dichotomy between Fender "brights" and Gibson "soft" (or let's use a positive adjective, warm), and that is where the player is striking the strings. If you take any guitar and strike the string in the middle, you will have a softer sound, whereas if you strike the string closer to the bridge you will have a brighter sound. This effect is very pronounced, unlike the elusive effect of scale length on overtone. It is much more likely to me that how scale length effects where a player picks the strings has more of an effect on its timbre than the scale length alone would have, like in a controlled environment. A smaller scale length brings the "center" of the string closer to the player. Additionally, different guitars force players hands to be in different areas. It is much more likely to me that how scale length effects where a player picks the strings has more of an effect on its timbre than the scale length alone would have, like in a controlled environment. A smaller scale length brings the "center" of the string closer to the player. Ok, so in conclusion, I decided that the practical effect this has is murky, and just opted to go for a more playable set up, with a shorter scale length. In addition, that will also mean I should use slightly heavier string (10s), which are just a tiny bit more comfortable for me on the higher registers. I sincerely believe in this regard that any magical effects endowed by scale length (or tone-wood) are highly exaggerated, and really the player is going to make a larger difference than anything, all things being equal. So, a comfortable player = better sounding guitar. It's highly subjective and I caution everyone to question anything they read about guitar tone. There are even Luthiers, who have books about building guitars, who use this this kind of vague hand-wavey science to say what's going to happen. It's a very complicated physical/psychological phenomena, and there are other much effects that are much stronger and more measurable. Note: The Collings guitar from above has a shorter scale length (24 7/8"). I chose a scale length of of 24 3/4" for the Worthmaster. Many guitar parts makers offer a variety of different fretboard radii, as well as neck profiles. I ultimately chose a 10"-12" compound radius, with a "V-C 88 95" neck profile. We'll dive into the consequences of different fretboard radii first, since neck profile is really just about player comfort and preference. When it came to picking a fretboard radius, there were a lot of options. Beyond choosing between a more or less rounded radius, there are also compounded radii, where the neck starts rounded at the top and ends flatter towards the bottom. Here's a visual explanation from Warmoth. A smaller fingerboard radius will equate to a more arc'd fingerboard, just like how you don't really feel the earth's curvature because it's so large as to appear practically flat. Therefore, when it comes to fingerboard radius, I think comfort is what matters and you can try out different things. However, there's also something more important, and that has to do with the natural shape of guitars. As you probably know, a guitar's string is tensioned between the "nut", which is the piece towards the top of the neck, and the "bridge" which is the piece towards the bottom, on the body. Virtually every guitar in the world has a wider bridge than neck. However, because the nut, fretboard, and bridge are all curved, the implications of this are not immediately obvious. In order for the string to have an even height from the fretboard as the length of the string travels from the nut, to the bridge, the fretboard's radius needs to follow a similar curvature. This is the main reason why one should want to consider a compound radius. Here's a video that explains visually what I mean much better than I can do with words. In order to calculate the best compound radius for my neck, I needed to start with the sizes of the nut and bridge, as well as the scale length. I then created a spreadsheet calculating how an idealized radius would change at each fret, based on these inputs. Finally, I inputed various possibilities that different manufacturers offered to see how that fretboard radius would deviate from this ideal. Based on this analysis, I realized the best option for my setup was a 10" - 12" compound radius. Here's a screenshot of that analysis: As for the neck profile, I chose a hybrid between something I knew was comfortable for me (the neck profile from the Collings LT M Special above), and a little experimentation, by also opting for a asymmetrical profile. Here's a list of the various profiles offered by Musikraft. In my case, in terms of size, I knew that I wanted something similar to the specs of the Collings guitar, which has a C shape profile, that's 0.865" at the 1st fret, and 0.967" at the 9th fret. Then in terms of shape, I wanted to experiment with a soft "V" shape at the top, for positioning my thumb to play chords more comfortably, tapering to a traditional "C" shape at the bottom. Musikraft's V-C neck was just the right shape for what I wanted, and their 86 96 option was exactly the size I wanted. In retrospect, I think the soft V is a little weird, and I would recommend just doing a normal C or experimenting with different profiles if you have that option close to you. Altogether though, I'm still very happy, especially with the size. An electric guitar's electronics will have the biggest impact on its overall sound. I'll discuss the various aspects of the electronics and why I made which choices. I chose to use Lollar P-90 Jazzmasters that I found used but in new condition on Reverb. I chose these pickups simply because I had played them before, in the Collings from above, and because I wanted to reserve the option of using other Jazzmaster shaped pickups in the future. These pickups are pretty expensive ($280 for the pair?), and if you're looking to build your own guitar and you're on a budget, I would caution you to seek out some less well known brands. TODO The hardware was the easiest choice to make throughout this process. I basically chose things that were a.) gold b.) fit the aesthetic and c.) were of a good reputation. I explain some of the bigger purchases in a little more detail below. I also used an input jack by Pure Tone, that has more points of contact. It wasn't really a lot more expensive than your traditional switchcraft-style, but it's really annoying to have a faulty input jack. The bridge I chose was a limited edition, gold plated bridge for offset guitars by Mastery. There were a few reasons for making this choice, despite it adding substantially to the cost. First, Mastery is a very well known brand, and I was convinced that for this design to meet the goals of best, I would have to use something of that level of reputation. Their bridges/tremolos are machined out of high quality materials, and they're often the most important upgrade Jazzmaster owners make. Second, I knew that once the gold plated bridge sold out, they would most likely not make more. That scarcity I think contributes to the design goals of this guitar. In this day and age, you can't build a guitar like this, unless you can find a used gold mastery bridge. By the way, I don't invent the rules as to how luxury vs commodity goods work. I was just trying to design a best in class instrument, slightly below what its peers would cost. Also, I can attest to the mastery bridge being a very nice piece of hardware. Is it worth the price? From a practical standpoint I think you can do fine with something more affordable, like your stock bridge for example. However, it is certainly easier to get a good setup with a bridge like this. I just wanted locking tuners, that had a similar visual style to vintage tuners. I found some by Gotoh in gold on Amazon. They weren't very expensive and I think I would recommend them as they're not crazy expensive, good quality, and there's really no snake oil in the marketing. To start, it was a given from the get go that I was doing a Jazzmaster shaped body for this build, which I think dramatically affects the mood. Offset guitars tend to have that groovy look to them, which is something I felt was important to lean into but at the same time balance. You can probably tell from my website that I like color. I've always really, really liked the "fiesta red" in particular. Vintage Fender, back in the day, used color codes from Dupont that were also being used by automobile manufacturers. The earliest Jazzmaster I've seen in that color was a '58, and I believe the same color was used by the Ford Thunderbird starting in '56. However, over time this color has been known to age on vintage fenders to more of a coral or tomato soup color. Basically, it became more pastel. That is exactly what I was looking for in the visual design. It's a bit difficult to see in the pictures though. One thing about that color is it's very hard to represent how it actually looks in a photograph. I'm not sure why, but it'd be interesting to research and write about why red in general is so difficult to represent in photos. Additionally, for the trim, I really wanted to try and do gold. I imagined that pastel fiesta red color, offset by gold trim would look really amazing. So I chose a gold plated bridge, gold plated tuning machines, gold hardware, and gold plated frets. This was kind of an homage/spin on the chrome bling from the 1950s. Before building the guitar, I built some mockups to get an idea of what it was going to end up looking like. Here's how the mockup compared to the end result, side by side. Building this digital model was helpful in terms of understanding roughly how things were going to look but it had some serious flaws. One, there was really no good way to model figured wood. I tried and I won't even both showing the results. They look very artificial. Also, I wasn't able to get the color right. That was because I had to choose between applying saturation and tint to the color that was already there (in the photo I was editing), and getting something that looked more natural, with the downside being the color itself was pretty far off. The other option was applying a color fill with the right color but that looked totally unrealistic. I have some ideas of how I can do this better in the future, but if there's someone reading this that has experience in building this kinds of photo mockups, please contact me, I'd love to hear your thoughts. Building this digital model was helpful in terms of understanding roughly how things were going to look but it had some serious flaws. Also, as you can see from the photo, the guitar looks very red in that picture. I would say that's more or less how it looks in real life about 51%, with the other 49% it looking much more pastel, virtually exactly like the vintage fender/car I have shown above. It is a total mystery. In any case, the mockups were still really useful, and I think the resulting guitar looked about about how I expected, if not a little bit better. One issue that came up was deciding what pickguard to match with the guitar. I tried buying several pickguards and doing some side by side photos to decide which to use. Following this process led to a surprising yet satisfying result. I was fully expecting and prepared to build something that looked like one of the vintage '58 fenders, which usually had a faded mint, almost seafoam colored pickguard. However, after comparing all the options back side by side like that, I noticed that the yellow tortoise shell pickguard was the clear winner. The only problem was the rest of the guitar was so shiny, and the pickguard I was interested in using had a flat matte finish. This is something I resolved later during the construction phase, by polishing the pickguard to a glossier finish. There were also plans to design and apply a label on a gold-back foil to the headstock, but unfortunately that had to be left for a later date. This phase of the project was very frustrating, as it was tedious (and expensive). I spent months agonizing over where I was going to get certain parts. In retrospect I'm happy with the results and I don't have really any complaints. My recommendation to anyone looking to do a similar project is spend most of your time knowing exactly what you want, and then put the most time and effort in material acquisition on your most expensive parts. That probably sounds obvious but it's really easy to want to get started right away and make bad decisions. The most important (and expensive) part of this build was the guitar neck. I ended up choosing Musikraft because they have an extremely good reputation, as well as were able to meet my design requirements the best. If I recall correctly, what put them over the edge vs. Warmoth were the options they had available for the gold frets that I spec'd out in the design. If I were to do this again, I would say they're still a fine choice, but I'd also recommend calling Warmoth first before ruling them out. I ultimately chose Warmoth. This was not a decision I made lightly. I looked for a very long time into finding a vendor to do the body. Originally I was going to choose a more boutique shop, until I noticed that virtually no-one does "showroom" finishes anymore. Nowadays, most of the custom guitar parts vendors offer some amount of "relic'n", where they systematically introduce wear and tear into the finish, free of charge. However, what this really comes out to, is that they're incapable of building showroom finishes at scale, since finishing is a very difficult and labor intensive process, so they don't bother. That's not to say no-one could do it, but after doing extensive research I realized that I had serious doubts. That's why I ultimately went with Warmoth. They were very transparent about pricing and are a large vendor, so I had confidence that they have the facilities to do all sorts of finishes at scale. Also, a word about "nitrocellulose" finishes. The truth is that paint is there to protect the instrument. It's absolutely true that vintage guitars have beautiful finishes, that were nitrocellulose based. However, those techniques, paints, etc... don't exist today. The nitro finishes that are offered by vendors today is really just a buzz word. Additionally, water based acrylics have really come along way and are virtually superior in everyone. My advice to those seeking a nitro finish is to just buy a vintage guitar. Otherwise, using modern techniques is going to give you the best results. I bought my mastery bridge directly from their website. The rest of the hardware was purchased from a mixture of Amazon and eBay. I picked up a nice pair of Gabriel Tenorio strings directly from his website as well. I can recommend these strings, and think they're about as the Thomastik Infeld strings I've used virtually my whole life. You might notice that I take aim at a lot of snake oil in this article, but strings are actually one area where I think it's absolutely worth spending money. Simply put, good strings has the most impact on your guitar for the money, in terms of sound quality. [...] strings are actually one area where I think it's absolutely worth spending money. Simply put, good strings has the most impact on your guitar for the money, in terms of sound quality. The pickups I bought slightly used on Reverb. The rest of the parts were purchased from guitarelectronics.com, as they were the only supplier I could find that had the sealed pots that I wanted in the specifications that I wanted. I also bought a bunch of different capacitors from them, as it made sense to just buy a bunch upfront. Everything else was purchased on eBay or Amazon. Here's a list of all the materials used, and their prices: The construction was the easiest part of the project and occurred over the course of a few days. The most important thing during this stage was just a little soldering and then getting everything to lay out on the pickguard correctly, so that it would fit inside nicely. The pickguard that I chose was unfortunately in a flat, matte finish. To make this work with the rest of the guitar I had to polish it. I started that process by hand, but then later tried using an electric buffer wheel. The left is before polishing, the right is after polishing. In retrospect, I would have chosen to do it all by hand if I could do it over again. The buffer wheel somehow introduced some circular scratches, although I'm probably the only person who knows they're there. An electric guitar is full of wires, which can turn it into an antenna. To reduce this effect, it's important to shield the electronics as best as you can, as well as make sure that everything has a path to ground. The two main areas where this is needed to be done is the electronics cavity and the pickguard. There are many methods of choice, but I felt that using a conductive paint designed for this would lead to the best results. I had to put on several coats before it would pass the continuity check. Note: there are some videos online that say you can make your own conductive paint by mixing graphite powder with normal acrylic paint. I was unable to get the result to pass a continuity test with my multimeter. Your mileage may vary. My recommendation is do the homemade route if you need a lot of paint. It didn't seem to me like paint was a good choice for the pickguard, because I needed to use tape to hold the wires in place. The paint left a residue in your fingers from the metal particulates suspended in it, so it seems that the tape would take paint off. Instead, I decided to use copper shielding tape. The trick here is to not take the tape all the way to the edges. That will affect how well the pickguard can actually close and fit with the body. Maybe if you had a way to make the edges clean and smooth then that would work, but I also haven't had any issues at all with shielding. There were a few modifications that I wanted to make, but fortunately Vann from Sidewinder Guitars was super kind and shared the wiring diagrams they include in their kits. This made the wiring I wanted to do super clear, so all I had to do was prepare a workspace and solder all the parts. In retrospect, I would have spent an extra $10 - $20 on more colors for my wire. The bridge fortunately came pre-drilled by Warmoth, but I had to install the tuners myself. At first this was a very stressful experience because I was sure that I had miscalculated something, as the bushings for the tuners did not seem to fit in the holes that came drilled from Musikraft. Before having a meltdown though, I decide to try building a small jig to see if I could cinch them down and it worked super well. I'm very glad I took this approach over using a mallet. After that came the next stressful part of drilling holes into the guitar neck to install the tuning machines themselves. I used a ruler and tape to align them the best I could, and then installed them in an alternating pattern, only cinching them down tightly once the rest were all in place. This project was was mostly a matter of patience. I'm happy with the results. The pictures don't really do it justice. The guitar looks, feels, and sounds on par with one the Collings LT M Special, I mentioned above, but the final price ($2654.47) was a lot less. Additionally, if I didn't care about a 1.) 5A flame maple neck 2.) a gold plated mastery bridge or 3.) boutique Lollar pickups the guitar would have been substantially less. Those parts I listed alone were nearly $1600 alone, and they are definitely not necessary if you want to build something for playability. Then again, the point of this project was to make something that made no compromises in terms of "build, components, finish, and especially sound quality", while being slightly below its peers in the same class. I would say that largely succeeded.Introduction🔗
Design🔗
Inspiration🔗


Research🔗
Wood choice🔗
Species Janka Hardness (N) Average Dried Weight (kg/m^2) Alder 2,620 450 African Mahogany 4,760 640 Hard Maple 6,450 705 Scale Length🔗

Fretboard Radius/Neck Profile🔗


Electronics🔗
Pickups🔗
Potentiometers and Capacitors🔗
Hardware🔗
Bridge🔗
Tuners🔗
Aesthetics🔗


Parts Acquisition🔗
Neck Vendor (Musikraft)🔗
Body Vendor (Warmoth)🔗
Hardware Vendors🔗
Electronics Vendors🔗
Parts List🔗
Brand Item # Price Ea. (USD) Total (USD) Musikraft Neck 1 $762.00 $762 Mastery Gold Bridge 1 $508.00 $1270 Warmoth Body 1 $411.36 $1681.36 Lollar Jazzmaster P90 1 $257.56 $1938.92 G&G Hardshell Case 1 $244.22 $2183.14 Gotoh Vintage Style Locking Tuners 1 $74.86 $2258 Warmoth Yellow Tortoise Pickguard 1 $44.00 $2302 Gabriel Tenorio Jazzmaster Strings 1 $27.00 $2329 LOXX Gold Strap Lock 1 $26.69 $2355.69 MG Chemicals Conductive Paint (Nickel) 1 $19.96 $2375.65 Fender JM Pickup Selector Switch (Lead) 1 $17.77 $2393.42 Fender Roller Pot Knobs (2) 1 $17.38 $2410.8 LoviMag 2” Copper Foil Tape 1 $15.18 $2425.98 Havasu Products Brown Nylon Guitar Strap 1 $14.99 $2440.97 Fender Roller Pot Bracket 1 $13.35 $2454.32 Fender Gold Neck Plate w/ Screws 1 $12.98 $2467.3 Fender Aged White Volume/Tone Knob Set 1 $12.86 $2480.16 Bourns 500K Sealed Audio Taper Pot 2 $12.49 $2505.14 Bourns 500K Sealed Linear Taper Pot 2 $12.49 $2530.12 Pure Tone Gold Input Jack 1 $11.09 $2541.21 Fender 1M Linear Mini CTS Pot 1 $11.00 $2552.21 Allparts Guitar Knob Puller 1 $10.99 $2563.2 Fender Gold Pickguard Screws 1 $9.73 $2572.93 Fender JM Pickup Selector Switch (Rhythm) 1 $7.69 $2580.62 KAISH 15/32” Gold Toggle Switch Nut 1 $7.58 $2588.2 Fender Pickup Foam Strips 1 $7.49 $2595.69 Fender 50K Linear Mini CTS Pot 1 $7.29 $2602.98 Fender Aged White Pickup Covers (x2) 1 $7.22 $2610.2 Gavitt PushBack Wire 22 awg (20ft) 1 $7.15 $2617.35 Orange Drop .033 Microfarad Tone Capacitors 2 $4.89 $2627.13 Orange Drop .047 Microfarad Tone Capacitors 2 $4.79 $2636.71 Orange Drop .015 Microfarad Tone Capacitors 2 $4.49 $2645.69 Orange Drop .022 Microfarad Tone Capacitors 2 $4.39 $2654.47 Construction🔗
Polishing the Pickguard🔗


Shielding the Electronics🔗
Painting the Electronics Cavity🔗


Shielding the Pickguard🔗
Wiring the Electronics🔗


Installing Hardware🔗


Conclusion🔗
Photos🔗


Resources🔗
Education Stuff🔗
Parts and Vendors🔗
°l||l°l||l°l||l°l||l°l||l°l||l°l||l°l||l°l||l°l||l°
click for comments